Kitchens and bathrooms just seem to make sense for underfloor heating, don’t they? Tiles can be brutal to walk on in the morning, and they’re one of the rooms in the house that gains more than any other from a constant temperature. The important thing to note, though, is that wet rooms have their own traps that can make an excellent underfloor heating installation an expensive mistake if you’re not careful.
Not careful in that it won’t be a good installation. It will be, and it makes a massive difference when it’s installed correctly. But water, moisture and the demands of these functional (rather than pleasurable) rooms create situations that an installer won’t find in a lounge or bedroom. Get these details wrong and it can turn into anything from an inefficient installation to a damaging one.
Why These Rooms Need Different Thinking
Most people likely think the installation of underfloor heating is exactly the same from a design and operational perspective no matter which room the heating system gets laid in. Not entirely true. As mentioned above, the nature of bathrooms (and kitchens) means they need to be considered slightly differently.
Firstly, they’re relatively small rooms. A couple of square meters of floor area isn’t unusual. Factor in the loo, the vanity and the bath or shower and the area available to be heated is tiny. And it needs to work harder to distribute heat over a larger area (with some higher-than-usual volumes sometimes for ceiling rooms) than most other rooms, meaning increased efficiency is a must.
Then there’s the moisture factor. Bathrooms experience levels of moisture that other rooms would be horrified to have. This impacts the function of insulation; it creates specific requirements for materials too. The underfloor heating has to work without fault under these conditions.
Kitchen layouts also work differently. They have fixed points like cabinets and islands, which take up space, and they have more restrictions on where the heat can be laid compared to where it needs to be laid if the installation is going to be efficient and comfortable rather than riddled with cold spots.
The Floor Covering Decision That Actually Matters
This is another area where things can get costly if the wrong decision is made. The choice of floor covering for underfloor heating has massive implications for how efficiently it works and how much it costs to run.
Ceramic and porcelain tiles are still considered the best option for underfloor heating systems in wet rooms (and for good reason). They’re excellent conductors of heat, won’t mess with the system by blocking heat flow once the system is installed, and they can handle the moisture that these systems are exposed to.
When people investigate Electric Underfloor Heating options for these types of rooms, tiles are still touted as the best covering for longevity.
Natural stone is also a great option, although it does take some time to heat up due to its thermal mass. Once it is heated, though, it distributes heat excellently. Just check that the structure of the floor can handle the weight, this isn’t always guaranteed in older houses.
Vinyl and laminate can cause headaches. Modern products that have been designed for use with underfloor heating can work, but it’s vital to check their thermal resistance values very carefully. Many vinyl products can become insulating after they are laid; they could trap heat below the surface but not do anything for the temperature of the room, meaning they’re not usually advocated here.
Wood and engineered wood can also work, but there are strict limits in terms of temperature that must be adhered to when these systems are laid. If they’re not, they can warp and crack. The only downside? Lower system temperatures mean lower output levels, which could become a problem if baths are being used in winter and higher levels of output are needed for comfort rather than just to take the chill off the air.
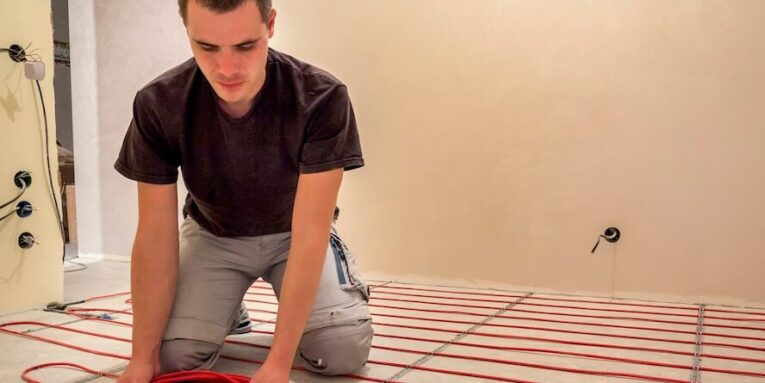
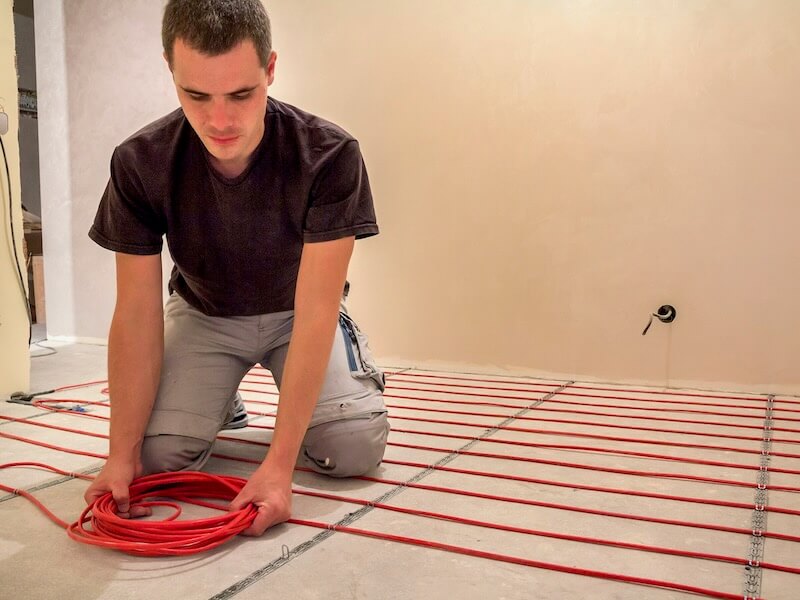
Layout Planning That Prevents Cold Spots
This is where it usually surprises people; the layouts of kitchens and bathrooms need to be planned. You can’t just lay heating wire or mats under any and every part of the floor. For fixed points like toilets and sinks, the heating needs to be distributed around rather than underneath; it only becomes useless space beneath these functional elements.
That said, heating is usually not laid under toilets and pedestals sinks anyway. There’s just usually no point. The units themselves block the heating from rising, so the area is wasted anyway.
It becomes a grey area under vanities; opinions differ even among installers. The thinking is usually that heat will radiate into the bathroom anyway, but many clients also want to heat this area for efficiency costs as well as comfort.
What about bathtubs? It depends on layout; heating under centrally placed tubs might not offer much comfort value but it might be worth including it just to avoid having to route cables or cut mats into complicated shapes.
For kitchens? Absolutely do not place heating sources under islands or fixed cabinets. Not only would it be an unnecessary waste of energy, but there’s always a slight (however minimal) chance that heat could cause damage to cabinetry over time.
The key here is to come up with a plan that ensures heat distribution around these obstacles and avoids obvious cold spots.
The best approach? Work out where heating will benefit kitchens and bathrooms; devise a layout around this to ensure comfort distribution instead of thinking about where installation would cause inconvenience.
Power and Insulation Requirements Nobody Mentions
Bathrooms need more power per square meter than other rooms. A lot more watts per square meter than what’s considered standard in common living areas if they’re going to generate warmth that will keep a person comfy after stepping out of the shower in winter. A bedroom might need around 100w per square meter; a bathroom might need anywhere between 150w-200w.
Power requirements mean a couple of things in terms of the electricity supply to these systems. Older buildings might require updates that don’t necessarily get factored into costs if electric underfloor heating systems are going to be installed; consumer units may require additional capacity; or older circuits may need to be replaced altogether.
There’s nothing tricky about insulation board beneath these systems; their effects are extremely impressive in these rooms! Without them, the heat generated by the system can escape downwards rather than into the bathroom where it can create an environment of comfort.
In lower ground bathrooms, the system will otherwise have to work hard to heat the earth underneath your home.
Excellent insulation boards can also impact how long systems take to reach target temperatures; long warm up times are often the case without them. Insulated systems warm up quickly, which is essential in bathrooms where people don’t want to stand around for 45 minutes waiting for their floor surface temperatures to reach some magic number that indicates comfort.
The Moisture Protection You Can’t Skip
Tanking and waterproofing are an absolute must in bathrooms, but they interact with underfloor heating systems in ways that require expert input rather than DIY attempts! The tanking membrane or slurry has to go over (and not under) the underfloor heating, but it also has to be placed in such a way that the tile adhesive doesn’t cause issues for anyone before they’ve even gotten to use their bathrooms.
Electric systems also require IP ratings if they’re going to be placed in wet rooms like bathrooms. The cables or mats can get wet without issues, but wiring routes and power connections often need safeguarding from equipment getting splashed. And what about thermostats? Ideally, these should be positioned where they’re not sprayed by showers or baths.
Areas in kitchens might not need to be treated like this, but splash back areas do get damp from time to time.
Thermostats That Actually Work Are Not Child’s Play
The placement of temperature sensors in bathrooms and kitchens is tricky compared to other rooms, where layouts are often less challenging. They need to be placed around fixed items and catering for this might affect their readings. Make sure they’re placed under important fixed features (like sinks or vanities) that have high turnover areas (people standing waiting for shampoo to come out of the bottle), rather than considering putting them directly into corners with limited air movement.
Instead of placing these types of thermostats in area corners with limited air movement, also do consider using air temperature thermostats instead of floor ones; this sometimes works better in functional areas such as bathrooms and kitchens.
Electric systems can play havoc with readings, but corrective measures can be put in place with draining plans.
Professional Installation Is Mandatory
This isn’t a DIY job. You might want to have a go at getting hot water pipes laid into concrete, but these systems come with their own challenges meaning expert input here will save you time (and money) overall.
Your installer should also test at various stages during installation before the system is covered by tile or concrete; after tiling but before commissioning.
And your installer should not take your word for it once load tests have been completed.They should ensure that resistance readings are fully compliant with all manufacturer specs.That way if issues arise later, you have documentation regarding cables/mats being placed exactly where you wanted them without any awful surprises should you need to drill holes for mounting rails or wall mounted items.
The Benefits When Everything Comes Together
When it’s all installed perfectly? It’s bliss. Cold floors in winter mornings disappear. Towels dry faster. Bathrooms and kitchens gain more than any other room from evenly distributed heat.
There’s no battling against ice cold patches; no horrible gusts of hot air wafting through bathrooms that never seem to dissipate that well during winter months.
Getting installations done perfectly? It should make such an obvious change that you actually enjoy spending time in rooms of your house that often become places we don’t relish venturing into once we leave those comfy bedrooms of ours. Just remember though, treat these installations for what they are: Specialty installations rather than standard installations.Go for the right floor covering.
Think ahead when planning the layout. Ensure there’s enough power/wattage available. Get onto someone who understands moisture requirements and builds upon age-old “but this works well!” knowledge. Get onto someone who will make sure your installer will thank you for your business eternally. Then just sit back and enjoy your floor system wishing you’d installed them years ago.
People also read this: The Hidden Dangers Of Addiction: Why Seeking Help Is Important